Convert the SureFire P60 Bulb to LED
A friend of mine got me the SureFire Nitrolon G2 for Christmas. It's an incredibly bright (65 lumens, according to their website) tiny flashlight powered by two lithium 123A batteries. He warned me about its tendancy to eat batteries. SureFire even sells the 123A batteries (one of which might keep your old 35mm P&S camera going for years) by the case.
Ironically, it didn't even consume one set of batteries (rated at 60 minutes with the stock P60 bulb) before the bulb gave out. Cracking it open I discovered that the P60 "bulb assembly" is a large component. And it's priced like a replacement bulb for SureFire's flagship $300+ lights.
Lemonade from Lemons
I decided to convert this bulb assembly to LED. I wasn't looking to duplicate the original bulb's brightness. My goal was to make a map light. Coincidentally, the Electronic Goldmine had a sale on item G13177, 5mm White LED. 99 cents for the brightest standard T 1 3/4 I've ever seen. It's no Luxeon Star by any stretch of the imagination, but at 15-25mA you can find your way around a dark room or easily read a book or a map. The other advantage is that I didn't have to try to cram any kind of regulating circuitry into the lamp assembly, just a current limiting resistor.
Deconstruction
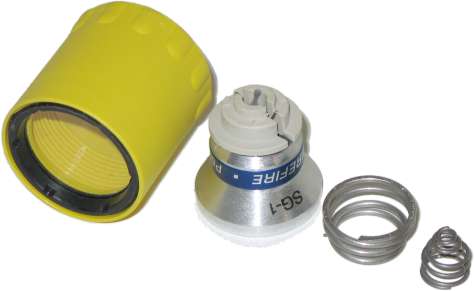 Here's the front housing of the flashlight along with the bulb (dis)assembly.
Before you remove the contact springs as I did, consider keeping
as much of the original bulb's leads connected to the spring as possible.
I was unable to get solder (regular, silver, with iron, gun or torch) to wet the steel springs, so I had to settle
for a clamping action. You might be able to solder to the original leads.
Here's the front housing of the flashlight along with the bulb (dis)assembly.
Before you remove the contact springs as I did, consider keeping
as much of the original bulb's leads connected to the spring as possible.
I was unable to get solder (regular, silver, with iron, gun or torch) to wet the steel springs, so I had to settle
for a clamping action. You might be able to solder to the original leads.
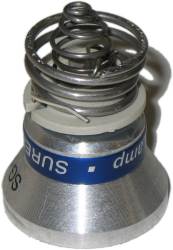
The large spring is the negative terminal, and makes contact with a metal tube inside the flashlight. The smaller spring contacts the positive terminal of the front battery directly.
The plastic part (where the springs go) is epoxied to the reflector and the bulb leads. You'll need to dremel out some of the epoxy with a small burr bit and then gently tap the Xenon bulb out the front of the housing. Then clean up any epoxy that will be in the way of the new LED leads.
The Replacement Bulb
The info I had about the bulb claimed it "worked on 4V". I decided to measure the Vf at a few different current levels to be sure. It turns out to drop about 3.4V at 15mA. I used a 110 ohm resistor which should yield around 25mA with fresh batteries. As the batteries die the current goes down and the Vf drops a little, which flattens the brightness curve a bit.
Shorten the long lead of the LED to about 1/4" (should
be opposite the flat side of the LED body). Do the same to one
lead of the resistor and solder them together. There's no need for anything
![]() smaller or shorter than a common 1/4 watt resistor here—there's plenty
of depth in the bulb assembly.
smaller or shorter than a common 1/4 watt resistor here—there's plenty
of depth in the bulb assembly.
As luck would have it, the best depth for the LED seems to be as far into the assembly as it will go. If you want to prove this to yourself, move it in and out and observe the pattern on the reflector. Insert it from the front, bend the remaining LED lead (gently!) into the deepest "trench" in the back of the assembly and leave the resistor lead sticking up. Hold the tip of the bulb with your finger and put a dollop of hot glue in from the back.
Re-Springing
At this point you've got to attach the resistor lead to the small spring (do that first) at the same time you pop the spring back onto the plastic mount. Then you've got to attach the remaining LED lead to the big spring at the same time you put it back on as well. If you left yourself some of the original Xenon bulb leads on the springs, try soldering to them. If you're like me, you don't have that option. In that case thread the lead through the spring, then twist the spring until it's clamping the lead, and put it all together. I arranged the leads so that when the springs are compressed in the flashlight they are clamped by the spring coils.